Creating New
ProofBlocks -- Video Example
Creating New
ProofBlocks -- Detailed Walkthrough
The first step in designing a
ProofBlock involves identifying the hypothesis and conclusion of
the theorem or definition in its formal language. Then students
must anticipate the format these pieces of information will take in
a problem and create shortened or symbolic versions that will be
written as inputs and outputs on the block.
To illustrate this process, consider the following example in which we will design a ProofBlock for the definition of a midpoint. As a first step, begin with the formal definition of a midpoint.
A midpoint is a point on a line segment that divides the segment into two congruent segments.
Rewrite the definition as a conditional (or in this case, a biconditional).
A point is a midpoint of a line segment if and only if it divides the segment into two congruent segments.
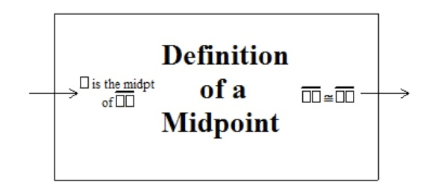
The information that a point is a midpoint of a segment will be given to students in the form “[blank] is the midpoint of [blank].” To assist students in identifying this statement when they see it, blanks are replaced with placeholder □ symbols, equal to the number of letters that they are representing. Thus, the symbolic version written on the block will look like “□ is the midpoint of □□.” The phrase “it divides the segment into two congruent segments” will appear in any proof in the form "□□ ≃ □□”
To illustrate this process, consider the following example in which we will design a ProofBlock for the definition of a midpoint. As a first step, begin with the formal definition of a midpoint.
A midpoint is a point on a line segment that divides the segment into two congruent segments.
Rewrite the definition as a conditional (or in this case, a biconditional).
A point is a midpoint of a line segment if and only if it divides the segment into two congruent segments.
The information that a point is a midpoint of a segment will be given to students in the form “[blank] is the midpoint of [blank].” To assist students in identifying this statement when they see it, blanks are replaced with placeholder □ symbols, equal to the number of letters that they are representing. Thus, the symbolic version written on the block will look like “□ is the midpoint of □□.” The phrase “it divides the segment into two congruent segments” will appear in any proof in the form "□□ ≃ □□”
Generally, the hypothesis will
become the input, and the conclusion will become the output of the
ProofBlock. However, for statements that are biconditional (like
the definition above), either piece of information could be used as
the input and a valid conclusion would still follow. To represent
this, the manipulative is literally reversible with the same
information printed on the back side of the block, except with the
inputs and outputs reversed.